Single Sign-On (SSO)
Nightingale monitoring supports Single Sign-On (SSO) functionality, including multiple protocols such as LDAP, CAS, OAuth2, OIDC, etc. The SSO feature allows users to log in to Nightingale monitoring through a unified identity authentication system, simplifying user management and login processes while reducing security risks.
For CAS, OAuth2, and OIDC methods, after a user logs in to Nightingale via SSO, Nightingale will check if the currently logged-in user exists in Nightingale’s user table. If not, a user will be automatically created. If the user exists, Nightingale will overwrite the existing user information in Nightingale with the user information from SSO (provided that the configuration item CoverAttributes = true is set, as described later). This ensures that users only need to maintain their phone numbers and emails in SSO, and Nightingale will automatically synchronize this information during login (note that synchronization only occurs during login, so users must log in to Nightingale via SSO at least once; otherwise, their information will not exist in Nightingale).
Configuring OIDC
This is the most recommended method. If your SSO supports both OIDC and OAuth2, it is advisable to use OIDC.
Configuration Item Explanation
Below is an explanation of each OIDC configuration item:
# Whether to enable OIDC single sign-on; Nightingale can enable multiple SSO methods simultaneously
Enable = false

# The login page will display a hyperlink to the SSO login address; DisplayName configures the text content of the hyperlink
DisplayName = 'OIDC'

# After OIDC login verification is passed, it needs to redirect to Nightingale. The following configures the callback address used by Nightingale for OIDC
# You need to replace n9e.com with your Nightingale address; /callback is a fixed path
RedirectURL = 'http://n9e.com/callback'

# OIDC SSO server root address; replace with your OIDC server address
SsoAddr = 'http://sso.example.org'

# Logout address of the OIDC SSO server; when the user clicks logout in Nightingale, they will be redirected to this address to complete synchronous logout of Nightingale and SSO
SsoLogoutAddr = 'http://sso.example.org/session/end'

# ClientId and ClientSecret assigned to Nightingale by OIDC; must be configured, generally obtained when registering the application on the SSO server
ClientId = ''
ClientSecret = ''

# When a user logs in to Nightingale via SSO and Nightingale finds that the user does not exist in Nightingale's user table, a user will be automatically created
# When creating a user, the user needs to be assigned a role; the following configures the list of default roles
DefaultRoles = ['Standard']

# When a user logs in to Nightingale via SSO, Nightingale will request user information from the SSO server and write the user information into Nightingale's user table
# If CoverAttributes = true, it will overwrite existing user information in Nightingale, such as phone number, email, etc. Usually, this should be set to true
CoverAttributes = true

# Scope is a concept in the OIDC protocol, representing the list of user information fields requested; usually the following fields
Scopes = ['openid', 'profile', 'email', 'phone']

# The user information fields in OIDC do not 100% correspond to those in Nightingale
# Therefore, configure below: which fields in OIDC correspond to each field in Nightingale
# Username, Nickname, Phone, Email are user information fields in Nightingale
# The following sub, nickname, phone_number, email are user field names in OIDC
# Adjust according to the user information fields of your OIDC server
[Attributes]
Username = 'sub'
Nickname = 'nickname'
Phone = 'phone_number'
Email = 'email'
Configuration Item FAQ
1. Users can log in successfully using OIDC, but username, phone number, etc., cannot be obtained
You can adjust Nightingale’s log level to DEBUG (adjust in config.toml), then restart Nightingale, filter the log keyword: sso_exchange_user: oidc info, and test the login again. You can check which user information is obtained from the single sign-on system, then adjust the field mapping in Attributes according to the actual situation.
Authing Integration Demo
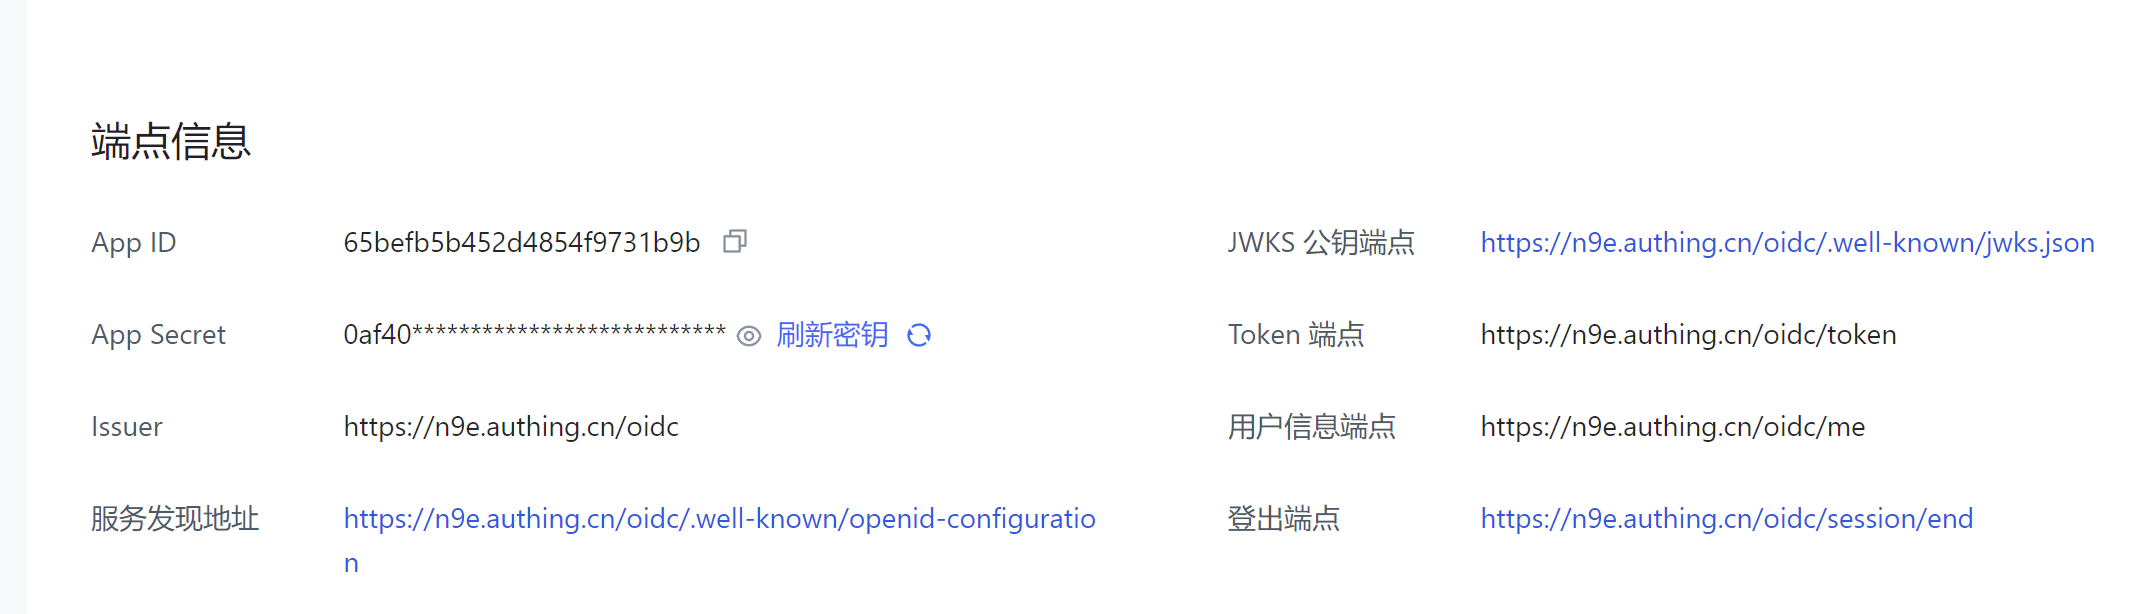
The following uses Authing as the OIDC SSO server for demonstration. First, create an application on Authing to obtain ClientId and ClientSecret.
Then configure OIDC-related information in Nightingale:
Enable = true
DisplayName = 'OIDC'
RedirectURL = 'http://192.168.127.151:17000/callback'
SsoAddr = 'https://n9e.authing.cn/oidc'
SsoLoginOutAddr = 'https://n9e.authing.cn/oidc/session/end'
ClientId = '65befb5b452d4854f9731b9b'
ClientSecret = '0af4...'
CoverAttributes = true
DefaultRoles = ['Standard']
Scopes = ['openid', 'profile', 'username', 'email', 'phone']

[Attributes]
Username = 'username'
Nickname = 'nickname'
Phone = 'phone_number'
Email = 'email'
The above 192.168.127.151:17000 is the Nightingale address of my test environment; you need to replace it with your own Nightingale address.
Feishu Integration Demo
Feishu also supports the OIDC protocol, and we will explain this method. Refer to Feishu’s official documentation to create an application: Configure Application Single Sign-On. Related configurations:
- Authorization mode: You can select both authorization_code and refresh_token
- Scope: You can select openid profile email phone offline_access
- Callback address: Fill in
http://n9e.com/callback, note to replacen9e.comwith your Nightingale address, which needs to be publicly accessible unless your Feishu is also deployed on a private intranet
After configuration, you can obtain the Issuer (i.e., SSO Server address), ClientId, and ClientSecret, and configure them in Nightingale. In addition, you can also obtain the SSO Logout address, which is similar to:
https://anycross.feishu.cn/sso/....../oidc/revoke
Configure this address in Nightingale’s SsoLogoutAddr. Although this address is configured, simultaneous logout is not possible. The following is the official explanation from Feishu’s documentation:
Since the login state of the SSO application is derived from the Feishu login state, single logout is not supported. That is, when logging out of the SSO application, Feishu cannot be logged out simultaneously. Although the platform provides a single logout address, this address is to prevent third-party systems from setting it as a required item, and the address itself does not take effect.
The final configuration in Nightingale is as follows:
Enable = true
DisplayName = 'OIDC'
RedirectURL = 'http://n9e.com/callback'
SsoAddr = 'https://anycross.feishu.cn/sso/XXXXX'
SsoLoginOutAddr = 'https://anycross.feishu.cn/sso/XXXXX/oidc/revoke'
ClientId = 'xxx'
ClientSecret = 'xxx'
CoverAttributes = true
DefaultRoles = ['Standard']
Scopes = ['openid', 'profile', 'email', 'phone']

[Attributes]
Username = 'name'
Nickname = 'name'
Phone = 'phone_number'
Email = 'email'
The above
n9e.comneeds to be replaced with your own Nightingale address, which must be publicly accessible unless your Feishu is also deployed on a private intranet.
Keycloak Integration Demo
A netizen previously wrote an article explaining how to integrate Grafana and Nightingale with Keycloak. You can refer to it: Deep Integration of Grafana and Nightingale with Keycloak.
Configuring OAuth2
If your SSO supports both OIDC and OAuth2, it is recommended to use OIDC. Use OAuth2 only when necessary, as OAuth2 has more pitfalls.
Configuration Item Explanation
# Whether to enable OAuth2 single sign-on; Nightingale can enable multiple SSO methods simultaneously
Enable = false

# The login page will display a hyperlink to the SSO login address; DisplayName configures the text content of the hyperlink
DisplayName = 'OAuth2'

# After SSO login verification is passed, it needs to redirect to Nightingale. The following configures the callback address used by Nightingale for OAuth2
# You need to replace n9e.com with your Nightingale address; /callback/oauth is a fixed path
RedirectURL = 'http://n9e.com/callback/oauth'

# OAuth2 SSO server root address; replace with your OAuth2 server address
SsoAddr = 'https://sso.example.com/oauth2/authorize'

# Logout address of the OAuth2 SSO server; when the user clicks logout in Nightingale, they will be redirected to this address to complete synchronous logout of Nightingale and SSO
SsoLogoutAddr = 'https://sso.example.com/oauth2/authorize/session/end'

# Address to obtain OAuth2 token
TokenAddr = 'https://sso.example.com/oauth2/token'

# User information address provided by OAuth2; Nightingale will obtain user information through this address
UserInfoAddr = 'https://sso.example.com/api/v1/user/info'

# When obtaining user information from OAuth2, the token obtained in the previous step needs to be placed in the request header
# The token can be placed in the header, formdata, or querystring, depending on the requirements of your OAuth2 server
TranTokenMethod = 'header'

# ClientId and ClientSecret assigned to Nightingale by OAuth2; must be configured, generally obtained when registering the application on the SSO server
ClientId = ''
ClientSecret = ''

# When a user logs in to Nightingale via SSO and Nightingale finds that the user does not exist in Nightingale's user table, a user will be automatically created
# When creating a user, the user needs to be assigned a role; the following configures the list of default roles
DefaultRoles = ['Standard']

# When a user logs in to Nightingale via SSO, Nightingale will request user information from the SSO server and write the user information into Nightingale's user table
# If CoverAttributes = true, it will overwrite existing user information in Nightingale, such as phone number, email, etc. Usually, this should be set to true
CoverAttributes = true

# Whether the JSON format data returned when obtaining user data from OAuth2 is an array, depending on the return format of your OAuth2 server
# If it is an array, Nightingale will take the first element as user information
UserinfoIsArray = false

# Prefix for OAuth2 user information, usually 'data', meaning the returned JSON data contains a 'data' field with user information
UserinfoPrefix = 'data'

# Scope is a concept in the OAuth2 protocol, representing the list of user information fields requested; usually the following fields
Scopes = ['profile', 'email', 'phone']

# The user information fields in OAuth2 do not 100% correspond to those in Nightingale
# Therefore, configure below: which fields in OAuth2 correspond to each field in Nightingale
# Username, Nickname, Phone, Email are user information fields in Nightingale
# The following sub, nickname, phone_number, email are user field names in OAuth2
# Adjust according to the user information fields of your OAuth2 server
[Attributes]
Username = 'sub'
Nickname = 'nickname'
Phone = 'phone_number'
Email = 'email'
Authing Integration Demo
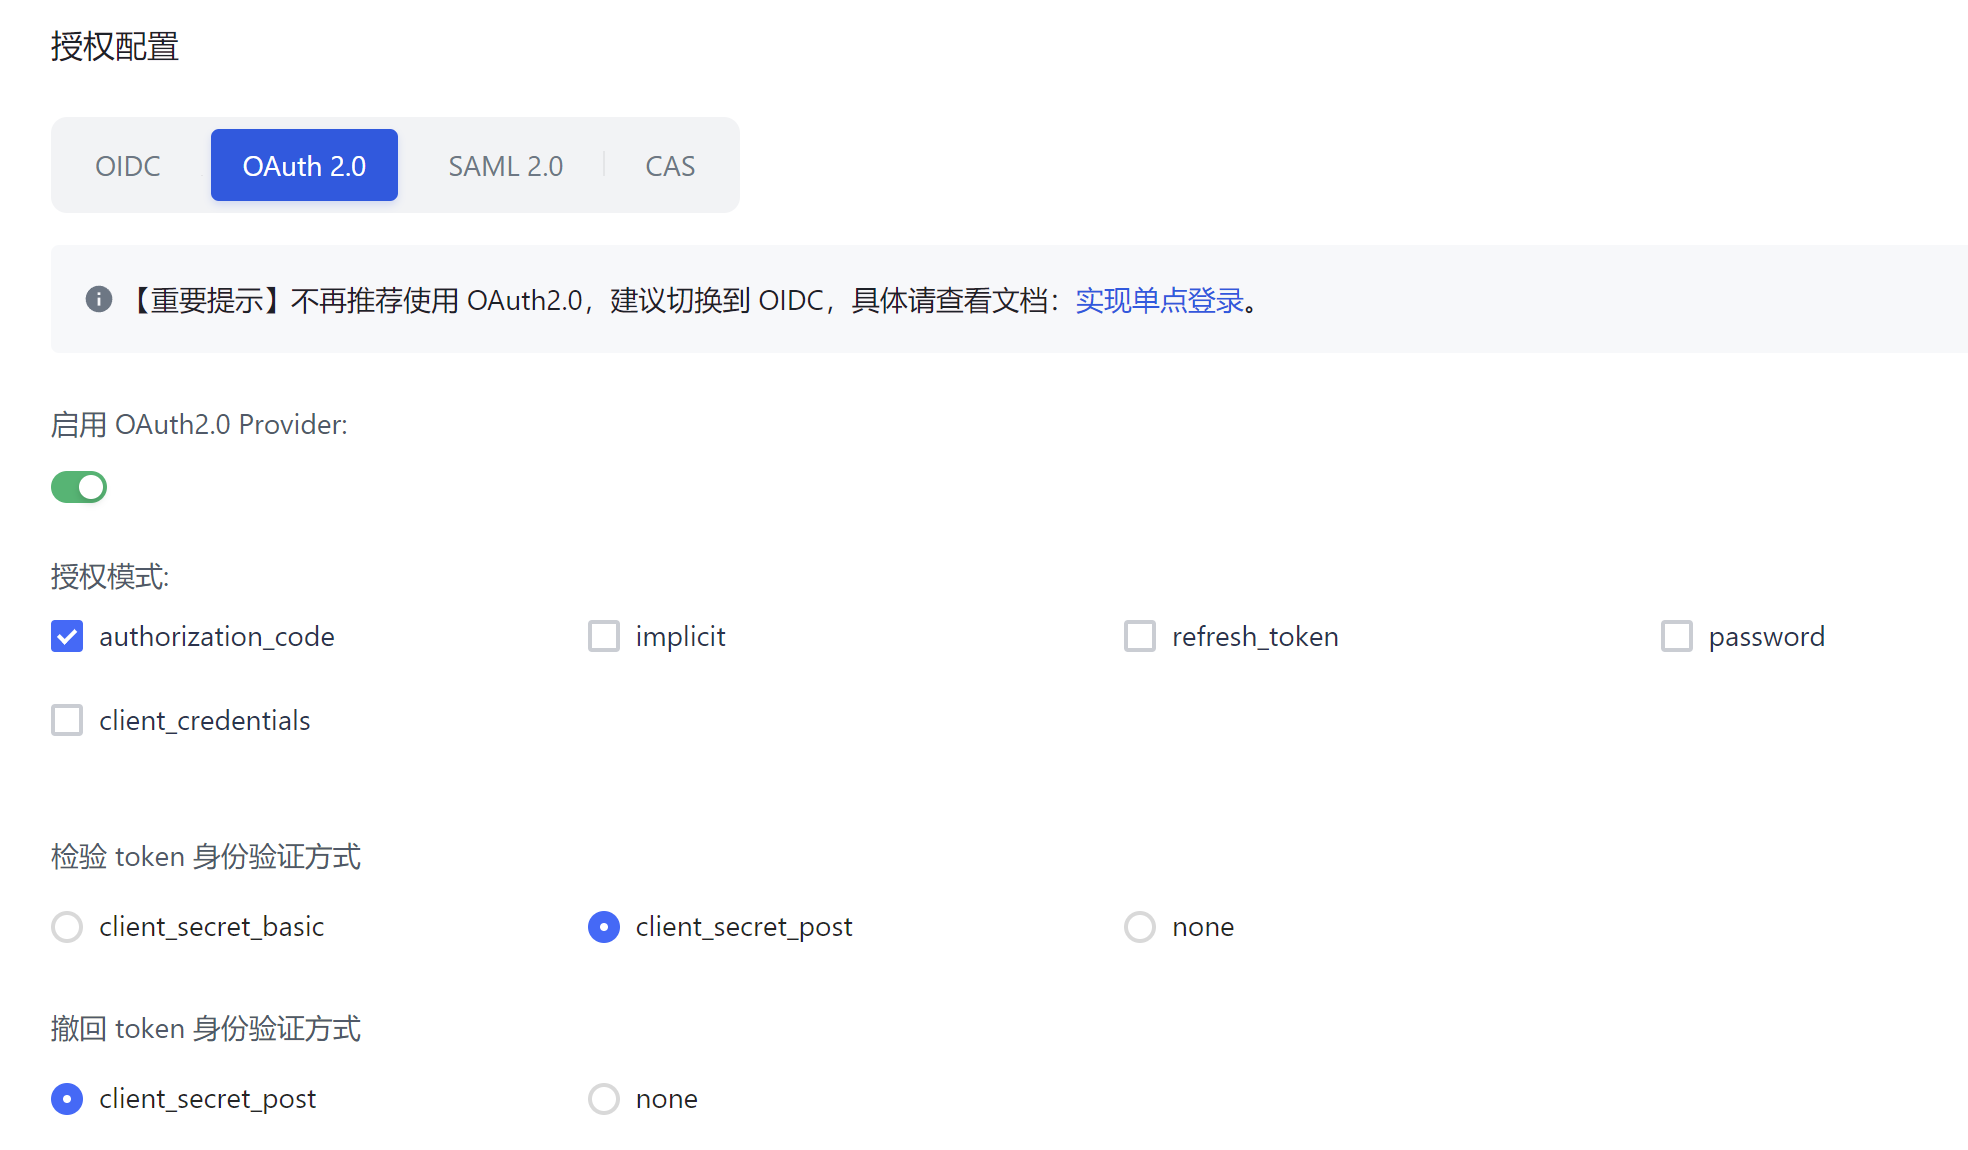
Use Authing as the OAuth2 SSO server for demonstration. First, enable OAuth2 on Authing. A configuration example is as follows:
Then configure OAuth2-related information in Nightingale:
Enable = true
DisplayName = 'OAuth2'
RedirectURL = 'http://192.168.127.151:17000/callback/oauth'
SsoAddr = 'https://n9e.authing.cn/oauth/auth'
SsoLogoutAddr = 'https://n9e.authing.cn/oauth/session/end'
TokenAddr = 'https://n9e.authing.cn/oauth/token'
UserInfoAddr = 'https://n9e.authing.cn/oauth/me'
TranTokenMethod = 'header'
ClientId = '65befb5b452d4854f9731b9b'
ClientSecret = '0af4...'
CoverAttributes = true
DefaultRoles = ['Standard']
UserinfoIsArray = false
UserinfoPrefix = ''
Scopes = ['profile', 'username', 'email', 'phone']

[Attributes]
Username = 'username'
Nickname = 'nickname'
Phone = 'phone'
Email = 'email'
The above 192.168.127.151:17000 is the Nightingale address of my test environment; you need to replace it with your own Nightingale address.
Configuring CAS
Nightingale monitoring also supports single sign-on via the CAS protocol. Compared to OIDC, it has more pitfalls, so use with caution.
Configuration Item Explanation
# Whether to enable CAS single sign-on; Nightingale can enable multiple SSO methods simultaneously
Enable = false

# The login page will display a hyperlink to the SSO login address; DisplayName configures the text content of the hyperlink
DisplayName = 'CAS'

# After CAS login verification is passed, it needs to redirect to Nightingale. The following configures the callback address used by Nightingale for CAS
# You need to replace n9e.com with your Nightingale address; /callback/cas is a fixed path
RedirectURL = 'http://n9e.com/callback/cas'

# CAS SSO server root address; replace with your CAS server address
SsoAddr = 'https://cas.example.com/cas'

# Logout address of the CAS SSO server; when the user clicks logout in Nightingale, they will be redirected to this address to complete synchronous logout of Nightingale and SSO
SsoLogoutAddr = 'https://cas.example.com/cas/session/end'

# The LoginPath configuration item is to be compatible with different CAS versions, as login addresses may vary between versions
# If you configure LoginPath, Nightingale will append LoginPath to SsoAddr as the login address
# If you do not configure LoginPath, Nightingale's logic is:
# 1. If SsoAddr contains the keyword p3, set LoginPath = '/login'
# 2. If it does not contain the keyword p3, set LoginPath = '/cas/login'
LoginPath = ''

# When a user logs in to Nightingale via SSO and Nightingale finds that the user does not exist in Nightingale's user table, a user will be automatically created
# When creating a user, the user needs to be assigned a role; the following configures the list of default roles
DefaultRoles = ['Standard']

# When a user logs in to Nightingale via SSO, Nightingale will request user information from the SSO server and write the user information into Nightingale's user table
# If CoverAttributes = true, it will overwrite existing user information in Nightingale, such as phone number, email, etc. Usually, this should be set to true
CoverAttributes = true

# The user information fields in CAS do not 100% correspond to those in Nightingale
# Therefore, configure below: which fields in CAS correspond to each field in Nightingale
# Username, Nickname, Phone, Email are user information fields in Nightingale
# The following sub, nickname, phone_number, email are user field names in CAS
# Adjust according to the user information fields of your CAS server
[Attributes]
Username = 'sub'
Nickname = 'nickname'
Phone = 'phone_number'
Email = 'email'
Authing Integration Demo
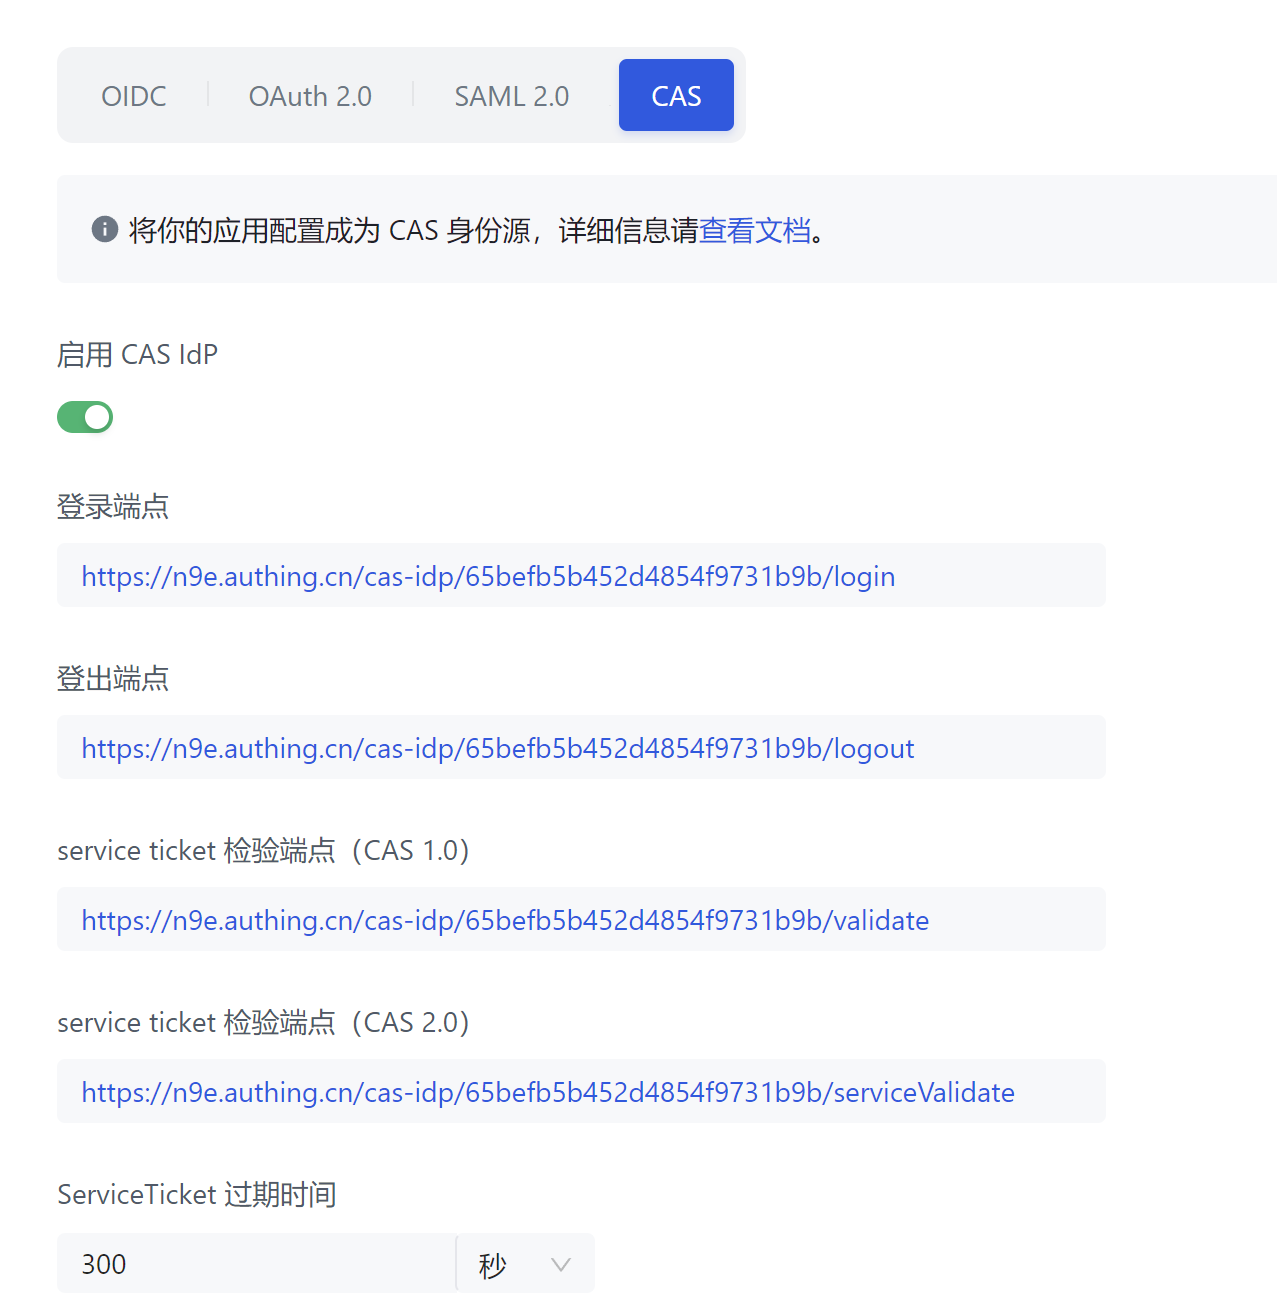
Use Authing as the CAS SSO server for demonstration. First, enable CAS on Authing. A configuration example is as follows:
Then configure CAS-related information in Nightingale:
Enable = true
DisplayName = 'CAS'
RedirectURL = 'http://192.168.127.151:17000/callback/cas'
SsoAddr = 'https://n9e.authing.cn/cas-idp/65befb5b452d4854f9731b9b'
SsoLogoutAddr = 'https://n9e.authing.cn/cas-idp/65befb5b452d4854f9731b9b/logout'
LoginPath = '/login'
CoverAttributes = true
DefaultRoles = ['Standard']

[Attributes]
Username = 'username'
Nickname = 'nickname'
Phone = 'phone_number'
Email = 'email'
The above 192.168.127.151:17000 is the Nightingale address of my test environment; you need to replace it with your own Nightingale address.
Configuring LDAP
Nightingale monitoring also supports authentication login via the LDAP protocol. LDAP is a lightweight directory access protocol, usually used for user authentication and authorization within enterprises. The previously mentioned SSO mechanisms (OIDC, OAuth2, CAS) cannot periodically synchronize all user information to Nightingale, but LDAP can achieve this.
LDAP does not have a separate login hyperlink entry on the page. When a user enters a username and password to log in to Nightingale, Nightingale first queries the user information in the database. If not found, it automatically checks if LDAP is enabled. If enabled, it directly uses LDAP for authentication login.
Configuration Item Explanation
# Whether to enable LDAP single sign-on; Nightingale can enable multiple SSO methods simultaneously
Enable = false

# LDAP server address and port, TLS, StartTLS, etc. configurations
# Configure according to your own environment
Host = 'ldap.example.org'
Port = 389
TLS = false
StartTLS = true

# Root DN of the LDAP server; you can Google or use GPT for more information
BaseDn = 'dc=example,dc=org'

# Administrator information; this account needs to have permission to query all user information
BindUser = 'cn=manager,dc=example,dc=org'
BindPass = '*******'

# Whether to synchronize created users in LDAP to Nightingale
SyncAddUsers = false

# Whether to synchronize deleted user operations in LDAP to Nightingale
SyncDelUsers = false

# Synchronization frequency, unit: seconds
SyncInterval = 86400

# Filter conditions to check if the user exists in LDAP during login
# OpenLDAP and AD usually have different filter formats
# The format for OpenLDAP may be: (&(uid=%s))
# The format for AD may be (&(sAMAccountName=%s))
# Adjust according to your LDAP server type
AuthFilter = '(&(uid=%s))'

# Filter conditions for querying all users in LDAP
# Adjust according to your LDAP server type
UserFilter = '(&(uid=*))'

# When a user logs in to Nightingale via LDAP and Nightingale finds that the user does not exist in Nightingale's user table, a user will be automatically created
# When creating a user, the user needs to be assigned a role; the following configures the list of default roles
DefaultRoles = ['Standard']

# When a user logs in to Nightingale via LDAP, Nightingale will request user information from the LDAP server and write the user information into Nightingale's user table
# If CoverAttributes = true, it will overwrite existing user information in Nightingale, such as phone number, email, etc. Usually, this should be set to true
CoverAttributes = true

# The user information fields in LDAP do not 100% correspond to those in Nightingale
# Therefore, configure below: which fields in LDAP correspond to each field in Nightingale
# Username, Nickname, Phone, Email are user information fields in Nightingale
# The following uid, cn, mobile, mail are user field names in LDAP
# Adjust according to the user information fields of your LDAP server
[Attributes]
Username = 'uid'
Nickname = 'cn'
Phone = 'mobile'
Email = 'mail'
If you are still unsure how to configure the above configuration information after reading the comments, you can consult your company’s LDAP administrator, who is likely to be familiar with it.